Creating Sub-Accounts from Your Dashboard
How sub-accounts work; steps to create them from your dashboard
Sub-accounts are real accounts that can log in to ProxyMesh, but with restricted capabilities.
Your account is the parent or main account, which has complete control over its sub-accounts.
You can set monthly or total bandwidth limits which control how much bandwidth each sub-account can use. You can then track the bandwidth usage of your sub-accounts and bill them based on their bandwidth usage.
Each ProxyMesh subscription plan offers a different number of sub-accounts.
If you reach your limit, then you will no longer be able to create more sub-accounts, and will instead get a 402 response code if using the API.
To remedy this, you must either upgrade your plan or delete sub-accounts.
Create a Sub-Account
- Log into your main ProxyMesh account.
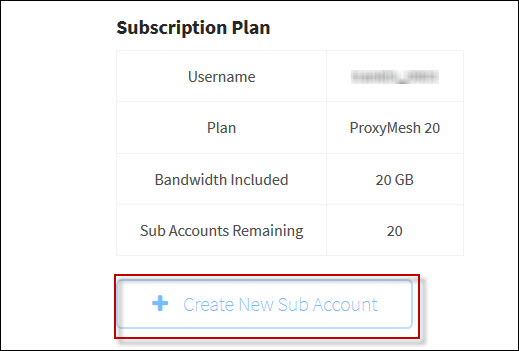
- Go to Subscription Plan near the bottom of your dashboard, which shows the details for main account.
- Click on Create New Sub-Account. The Update Account screen appears.

Note that the label Create New Sub Account appears near the top.
For subsequent edits on this sub-account, the label will change to Edit Sub Account.
For the creation of the initial sub-account, fill in the fields as follows:
Username for the sub-account. Required: up to 30 alphanumeric characters, including the following 4 special characters @ . + -
Password: Create a password for this sub-account only. Optional: up to 128 characters.
- The first name of the cardholder on the main account: Up to 20 characters.
- The last name of the cardholder in the main account: Up to 20 characters.
- Email: Sub-account email for receiving communications.
After completing your entries, click Save Account.The following confirmation appears near the top of your dashboard screen.
The username refers to the sub-account username.

Edit the Sub-Account
To edit the sub-account, go to Current & Past Bandwidth Usage on your dashboard.

You will now see more than one username in this section of the dashboard.
The top username is the main account username.
Any names below it are the sub-account usernames.
- Click the username of the sub-account you want to edit.
- The Update Account screen appears, this time labeled Edit [username]. This screen has three sections: Edit Sub-Account, Edit Sub-Account IPs, and Set Bandwidth Limits for Sub-Account.
If you click Save Account in the top section, you are prompted for the password of the sub-account.

The above Edit Sub-Account section doesn’t necessarily need to be updated; it displays the same details of the sub-account you’ve just created.
The second and third sections must be updated.
Edit the Sub-Account IPs
The second section of the screen is for editing IPs.

To edit IPs for a sub-account, do the following:
- Enter one or more of the sub-account’s actual IP addresses (not the authenticated proxies).
Entering labels for authenticated IP addresses is an option provided for your convenience. These reference labels are for display only.
Authenticated proxies for sub-accounts are the same as those for the parent account and cannot be changed. - After completing any entries as needed, click Save IPs. The system saves the IP entries without further prompts.
Set Bandwidth Limits for Sub-Account

To set bandwidth limits for the sub-account, do the following:
- Enter either the monthly or total bandwidth limit in gigabytes (GB) for the sub-account.
- After completing your entries, click Set Bandwidth Limits, which takes you to Update Account at the top of the screen.
This completes the creation of your new sub-account.
Please see our blog article Using Proxy Sub-Accounts for Marketing Strategies